Make This Tonight! Super Easy Pasta Sauce

Homemade Tomato Sauce, quick sauce

Here’s what you need. Does it look easy? It is! It’s the…

Super Cinchy Pasta Sauce that is Awesome

adapted from Marcella Hazan, Essentials of Italian Cooking

5 minutes of prep, 40 minutes simmering, serves about 4-5 with pasta.

Ingredients:

  • 1 onion, peeled and cut in half
  • 5 Tbs butter (We use unsalted but doubt it matters)
  • One 28 oz can of diced tomatoes
  • Salt and pepper to taste

Procedure:

The short directions:

  • Melt the butter
  • Add the onion, let it cook 2-3 minutes
  • Add the diced tomatoes
  • Simmer for 35-40 min, stirring occasionally
  • Remove the onion, add salt and pepper to taste, serve.

The long directions:

  • Melt the butter over medium heat, (a heavy bottom pot is best).
  • Place the peeled onion cut side down into the pot.
  • Allow the onion to begin to cook in the butter – approx 2 to 3 minutes.
  • Add the diced tomatoes
  • Stir occasionally to mix in the butter and to keep the sauce from burning to the bottom of the pot. (Hint: if it does burn a bit, just stir without scraping up the burned bits into the remaining sauce and call it “smoky tomato sauce”).
  • Once the sauce starts to bubble, turn down the burner to simmer gently for another 30-35 minutes.
  • Taste. Add salt or pepper if you like. Or not.
  • Remove the onion.
  • Serve the sauce over pasta, vegetables, potatoes, polenta etc.

Enjoy! Feed the people real food! Go paint the basement!


New Year’s Resolution – preserve my kid’s art!

Paper Mache Animals 1

Before my kids graduate from high school I should probably get a start on preserving some of the adorable, one-of-a-kind art projects they’ve brought home over the years. Things are getting a little (very) dusty plus starting to fade and become brittle. I decided to experiment with a Mod Podge protective coating thinking that it might preserve my favorite pieces and maybe even restore them a bit. I wasn’t sure what to expect and I had a couple of questions: Continue reading

Upcycled Awesomeness in Kauai – KIKO simple goods

Kauai, Kapa'a, Recycled, Upcycled, Crafts

Aloha and Mele Kalikimaka (that’s Hawaiian for Merry Christmas – a tad late, but still –) We’ve just returned from a very fun trip to the Hawaiian island of Kauai. In between the (muddy & fun!) hiking, beaches, and dodging wild roosters, we explored the lovely low-key town of Kapa’a. This was one of our favorite finds, KIKO simple goods*, specializing in unique local art, upcycled goods and clever environmental products. It just made us happy (plus it doesn’t hurt to be located in paradise…). Be inspired, visit the web links and if in Kauai, visit the store!


* KIKO’s has opened recently and they don’t have a website yet, but when they do I will update this post with a link – because they really are awesome. This is NOT a sponsored post, just love from an admirer.


Pendant Light With Pulley

My sister hinted that she wanted me to make her a pendant light using a pulley she found. Actually it wasn’t a hint so much as a demand. My sister isn’t known for her subtlety. She also doesn’t read this blog, so I’m safe. 🙂

I’ve had the pulley for quite some time and I just now finished in time for her birthday.

diy light, how to make a light fixture, interior design, salvage design, up cycle, green design

The parts:

I found the bracket on Etsy, from a cool shop based in Wisconsin (Gizmo and Hoo Ha) with all sorts of vintage odds and ends. It was listed as a holder for horse bridles and tack, which is special because my sister used to be a big horse-back rider.

The lamp parts (wire, socket, plug, cage) I bought online through Sundial Wire. A big plug for them here (pun intended) – not only do they have very nice lamp parts, they also give very detailed instructions on how to wire a plug and socket.

(Side note: Unfortunately, I lost the photos I took of the individual parts before I put the lamp together. My memory card went kaput after I took the pictures and could not be recognized by the computer or the camera. The good news is the store exchanged the damaged card for a new card, but the bad news is all the photos were lost. Has this ever happened to you?)

Happy Birthday to my sister!


Quick Update for a Plain Built-in Cupboard

A quick project.

This built-in in our dining room has always bugged me with its flat doors that have no detail. Dining room built-in, 1911 house.

The other doors in our house have a simple raised shaker style border, which aren’t so fun to dust, but look nice.

While we were painting the floors it dawned on me that it would be pretty easy to give the doors a quick facelift with some trim. The husband said “sure, it’s a good idea, but it’s certainly not a priority right?” I said “oh right” and then went out the next day and bought some inexpensive molding. He rolled his eyes.

It was pretty easy – it took about 4 hours. This is how we did it:

  • Purchased Trim. We used hemlock lattice molding (.25″ x 2.25″).
  • Removed doors. We unscrewed the doors from the frames.
  • Carefully measured and cut (with a chop saw) trim to fit door.
  • Notched out trim for hinges with X-Acto knife and chisel/hammer.
  • Applied wood glue to the back of the trim, lined it up on the face of the door, and clamped the heck out of it. Protected trim from clamp marks with wood scraps.
  • Let it dry overnight.
  • Filled in any gaps with Elmers Wood Filler.
  • Sanded and eased edges slightly with hand sander.
  • Primed, painted.
  • Re-installed.

Here’s what it looks like now. I also got some new simpler bin pulls and knobs. The husband’s comment was “oh sure, I guess it looks better – but, would you ever paint the entire built-in a color? It kinda looks like primer right now.”

What do you think? Should I paint it a color?

Dining room built-in after, with added shaker style border.

Dining room built-in (after) with added shaker style border.

Mod Podge the Chicken Coop – or How to Keep The Hens Happy

This post originally appeared at Mod Podge Rocks Blog. Check it out for more great crafting ideas.

exterior mod podge, chicken coop

Poopsie Lulu was upset. Her coop was looking shabby and in dire need of an update. It was High Time for a bit of love and attention.

Poopsie-at-the-Door-615x409She gave me a stern look.

Poopsie-Looking-Stern-615x528Yikes! I have a blog to write, Poops, (Hammer Like A Girl) – I am so sorry I don’t have time for this right now! You are a talented girl though – I bet you could tackle this on your own. (Time honored parenting advice) I directed her to Google for a few ideas.

Poopsie and “The Google”

Google-Chicken-Coops-2Whoa!! Dial it back a bit, girlfriend, how about we start with some Mod Podge . . .

So Poopsie and her coop-mate, Princess, did a bit more research and with a stroke of  cLuck they discovered the site, AllPosters, with a fine selection of poultry art! And cheep! Very eggcited, they set to work.

First they organized – gathering:

  • Paint brushes for Mod Podge, 1″- 3″ widths (which can be cleaned and re-used)
  • A pencil for marking where to apply the glue and paint
  • Mod Podge Outdoor
  • Mod Podge Antique Matte
  • A stiff squeegee/hand burnisher
  • Black paint, exterior
  • A small paintbrush for thin black lines
  • A wet rag to wiping off mistakes

Next, the girls cleaned and painted the offending front door.

BEFORE

Chicken-Coop-Door-Before-e1411414972265

AFTER

exterior mod podge, chicken coop 
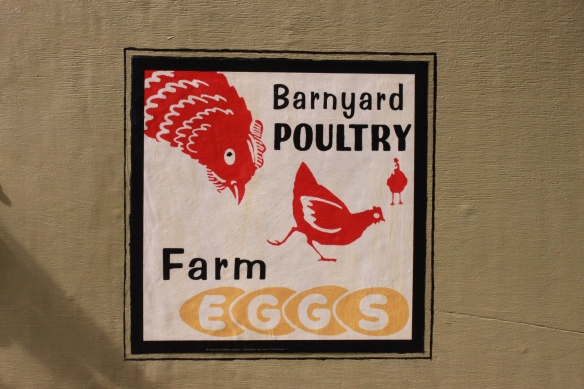
Examining the poster they had purchased and realizing they were not happy with the overly pristine look of the print, they decided to experiment with aging it a bit by applying one coat of Mod Podge Antique Matte finish. These girls have discerning taste. After a 15 minute drying time it had just the right patina.

Holding the poster against the door, an outline was gently traced in pencil and filled in with Outdoor Mod Podge.

Modpodging-the-doorWorking quickly – especially for hens – they brushed the Outdoor Mod Podge onto the back side of their poster and applied it to the (still wet) door.

Modpodge-the-backThey carefully smoothed the poster onto the door with the squeegee/hand burnisher.

Modpodge-squeegeeNow those ever-clever hens decided to solve the problem of “glue creep” – glue creeping outside the edge of the poster and onto the door – by painting a border around the edge and about 1/2″ out. They also painted the distracting white edge of the poster. In this way the potential shine of the glue seems intentional. Free-handing the black paint gave the piece a more hand-made appeal

Paint-the-poster-edgeThe final four thin coats were applied the same day, allowing a 20 minute drying time for each coat. These layers were painted on all the way to the outside black line, insuring a good seal of the poster edges.

Thin-layers-of-exterior-modpodge-e1411358958596Well done my eggceptional girls! I knew you could do it!

Modpodge-Poster-FinishedHere’s Princess – she wants to share a joke with you.

Two ducks were sitting in a pond and the first one says, “QUACK!”, and the second one says, “That’s funny, that’s what I was gonna say!”

Princess
We love silly jokes and mod podge projects – send us something!


DIY Halloween Tombstones!

IMG_3014

Here’s what my son ( and his amazing assistants, mom and dad ) have been up to most of the month of October. Tombstones. Realistic, detailed and creepy Halloween decorations. Check it out:

DIY Halloween decoration, DIY Halloween gravestone, Halloween cemetery

My initial plan was to write a “how to” post with these – but it’s so complicated and detailed that I think a simple slide show is far more fun, so here you go:

Add a little moss from Home Depot and a couple crows from Display and Costume   and you are all done!

DIY Halloween decorations, Halloween decor, How to make Halloween  tombstones

Happy Halloween from all of us at Hammer Like A Girl 🙂

More Functional Art

I’ve been working on some more functional art for Matter Gallery in Olympia. It was fun working on the pieces and a little hard to hand them off  – like saying good-bye to your children. Check out their shop either online or in person, Olympia is full of interesting places to visit!

You can see more functional art here.

The Big Albert Lee Appliance Sale is Coming!

Need new appliances for your home or rental? The Albert Lee Appliance Sale is coming this Nov 1 & 2nd.  We’ve seen everything from your standard kitchen appliances to Viking ranges, Miele vacuums, to outdoor BBQ’s and more. Check out this link as it also contains important hints for shopping. You may also want to bring a smartphone for research on the spot. Be sure to get there early – 3:55 am if you’re serious (and crazy like Monica) – they will have coffee…

Two of Our Favorite & Quick Painting Hacks!

Exterior WindowsWe make a lot of mistakes when painting, so we have a couple quick ways to fix them.

The first is to simply wipe them off with a wet rag we carry in our canvas work apron. You may end up wiping off paint from the surface where you actually wanted it, but that’s OK, just paint again – and sometimes you will need to wipe fairly hard to remove it ( depending on how long you waited to address it. Our advice – do it right away.)

The second is a tip from the handy husband. He used to paint houses in the summer to save money for college. You simply wrap your wet rag around a small putty knife. This allows you to clean up tight corners and other hard to navigate areas.

How easy is that! Happy painting 🙂

PS – Daly’s Paint, has a gift for signing up for their e-newsletter; a free pint of C2 paint each month. We just picked up Tangerine! Sign up for the Color Club here.

Share your hot painting tip with us – if we receive enough we can write a post with them and will be sure to give you credit!