

Beauty is in the eye of the beholder
I’m so grateful for friends, with sewing machines, and talent, and good humor, and sewing machines. Making slipcovers is not my thing – I am one avowed lousy seamstress. Heidi and Mary Jean weren’t fazed, they tackled it just like any other project, one step at a time – while I drug my feet, ordered fabric, wrote checks, and silently panicked. Looking back, I think I was afraid to put so much effort and $$$ towards something I wasn’t at all sure I would like. Wouldn’t it be easier/smarter to just buy a new couch? Ultimately, the retro shape, solid construction, and perfect scale of the two Salvation Army couches swayed me. I remember thinking of the architect Frank Lloyd Wright’s famous quote, “The physician can bury his mistakes, – but the architect can only advise his client to plant vines.” In my case vines = accent pillows and throws…OK then…thanks Frank.
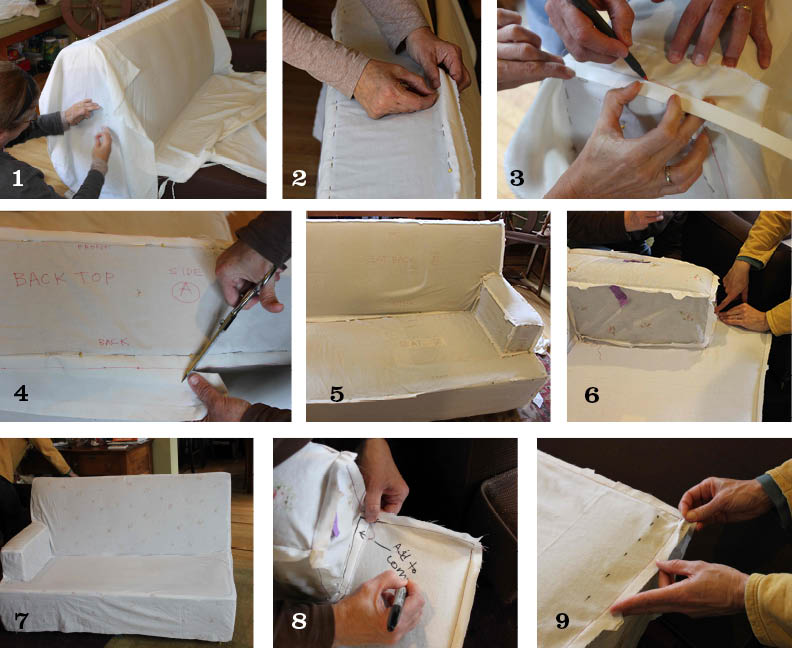
Below is a basic outline of the steps for our slipcover. Our goal was never perfection (is it ever?). We were after a decent, fairly loose-fitting cover, that would change the color and update the feel of the living room. The take-away is hopefully this: it’s do-able, you can use things you already have (old sheets for patterns, re-purpose a bedspread or heavy curtains), friends lighten the load both emotionally and practically, and, if you don’t like it – well – there’s always pillows and throws!

Creating the Pattern
- Covering the couch with muslin pieces. (We used old sheets)
- Pinning sections together along seams
- Using a 5/8″ wide cardboard template to mark for the added seam allowance
- Cutting out the pattern, adding notches for proper alignment when sewing. Note! We labeled the pieces like crazy.
- Completed muslin pattern, pinned together
- Completed prototype. We made a test/prototype from another old sheet set – it almost fits!
- Figuring out a troublesome intersection
- Making adjustments
- Making more adjustments!

The ordering process: Samples, estimating the yardage needed, and committing to the order – yikes!

Cutting & Sewing
- After pre-shrinking and ironing the new fabric (very important – but you don’t need a picture of my washing machine), laying out the pattern pieces
- Making sure the pattern pieces are laid correctly with the grain
- Prior to cutting, verifying again that everything is laid out correctly
- Labeling each piece as soon as it is cut, noting the right side of the fabric
- Sewing (finally!)
- Ironing, really important to get all the seams nice and flat
- Lunch (of course!)
- Checking the fit of the arm, inside-out
- Checking the fit of the arm, right side out


Done! Actually, almost done – a few details remain such as changing the feet and adding a bottom border – but there is light at the end of this tunnel! Plus, I like it 🙂
And what were Heidi’s last words as we were cleaning up? “I wonder if it needs piping…”
Resources
We found a few great resources along the way for those who may want more details and direction. Check these out:
http://howtoslipcover.blogspot.com/
http://customslipcoversbyshelley.blogspot.com/
http://www.etsy.com/shop/AVISAOrganics (beautiful fabrics)

So cool! I own this couch too, except I own both halves. Is yours a Montgomery Wards too? Thank you for the inspiration!
LikeLike
Cool! I have both too, I love the size and shape.I’m not sure if its Montgomery Ward as I’m not home at the moment, but I did take pictures of a few of the tags since it was an upholstery company in Seattle named after the neighborhood, Magnuson. https://hammerlikeagirl.wordpress.com/2012/01/13/slipcover-fabric-quest/
Anything look familiar?
LikeLike
So I looked at the tag and it seems that Magnuson Furniture actually made it (defunct of course). It may have a long life, it seems really well made. We just unscrewed the legs so I think we will be able to replace them with something a little more chunky. Have any plans for yours?
LikeLike
OMG, I’m the person who’s always wanted this look but am sooooo chicken to start. You can’t see but I’m bowing to you with arms stretched out…”oh sewing goddesses, I’m not worthy”, Congrats on a job well planned/executed/done.
LikeLike
hahahahhaha– Heidi is the only goddess over here! I agree with the chicken part of you tho, I was truly afraid to commit as it’s not inexpensive, even if done yourself, and it’s such a big design statement in the room. I think I might try something smaller the next time, and possibly made from re-purposed material I have here. I do love the fabric I bought from AVISA, it’s beautiful and seems really sturdy ($20/yd I think). You should go for it – you could at least start with the pattern of old sheets and then make a prototype out of more old sheets. This gives you such a good idea of what you’re getting into, before you’ve committed any $$$. AVISA is terrific about sending samples when it’s time to find fabric. Plus we can be your virtual cheerleading squad– you are worthy, grasshopper.
LikeLike
Still haven’t started, gads I got lots of stuff here and there half done 😀 I took apart this vintage tea chart I got for Christmas. It was frightfully easy to do as the glues were all dry and it was plenty wobbly. I’m in the process of stripping varnish and sanding. Then I’ll prime and paint….of course there’ll be a blog….maybe by this xmas…LOL. Hey, how are your gorgeous slip covers holding up? I guess it’s been a year.
LikeLike