After taking a summer “hiatus” from house projects, we were finding it hard to get motivated to start tackling real projects on our houses – like caulking leaky gaps, repairing a broken window pane, sanding/cutting/sealing/finishing 30 pieces of window trim….. SO, we decided to ease into it with a totally just-for-fun project: designing and covering pendant lampshades. (It is our way of procrastination.)

An easy and inexpensive way to spice up some plain white lampshades – print a design onto dictionary pages and glue them to the shades.
I wanted some fun lampshades for the 3 pendant lights which hang at the top of the stairs. I bought 3 plain white Ikea shades, long ago, thinking that I would do something with them, so it was time to dig them out and actually follow through. Design-wise, I wanted something warm and funky. So…. I did what I always do in a situation like this: got out my Gramma’s old dictionary and called Mary Jean and Monica. (There are people in my house who are starting to fear that soon every surface will be covered with dictionary pages.)
I’ll show you how we covered the lampshades here, but you are going to have to find your own Mary Jean and Monica. ;o)

Original Ikea Lampshades

The basic idea was to print a type/image collage onto dictionary pages and glue them onto the lamp shades. I have a thing for type, and wanted to include words, so found and scanned some rubdown letters at a craft store (you probably wouldn’t need to go to the trouble of scanning an alphabet when you could use an existing font, but I really like the irregular/distressed look of this font). We found and scanned some graphics from clip art books (you could probably find similar images online, although the Dover clip art series are copyright free).
To get an idea of what the 3 shades would look like beforehand, we laid them out full size in the computer (InDesign) and played around with size and overlap. (We also scanned a page of the dictionary to use a placeholder for the background to see what it would actually look like when it was printed onto the dictionary paper.)

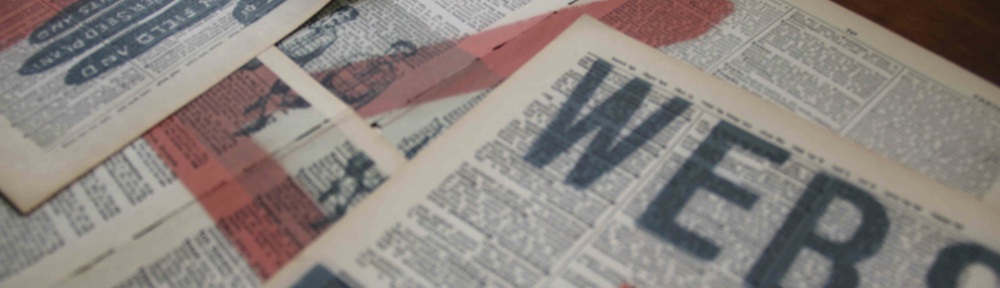
When we got the look we wanted, we copied each of the 3 collages and created two new pages of 8.5″ x 14″ (legal size) and one page of 17″ x 14″ (double legal size) and placed each collage onto its own page.


We carefully dismantled sections of the dictionary so we ended up with spreads (2 pages), and cut them down to 8.5″ x 14″ to fit through the printer. The pages were really brittle so was a little nervous to feed through the printer, but it worked fine. The “AZ” shade was 17″ tall, so we selected “tile” when we printed it, so it printed onto 2 pages. My inkjet printer uses a waterproof ink, which is probably important.

Collages printed onto dictionary pages.
It was time for the fun/scarey part – attaching the pages to the shades. We thought about using Mod Podge (again, like the table), but was afraid of problems with brittle pages and curved soft surfaces. We did a test using Super 77 on the back of an extra page, letting it dry, then coating it with satin water-based Varathane. It worked great!
We set up a little spray booth outside (Super 77 is Super Stinky) and started attaching.


- After spraying the back of the page with spray mount, we carefully attached the page to the shade, letting about 1″ extra overhang the edge.
- Overhang. (As were working, we decided the “Websters Dictionary” type looked better running vertically up the shade.)
- Carefully (did I mention the pages are brittle?) trim overhang to about 1/2″.
- Very carefully snip downward with scissors every 1″ or so, to allow for curve.
- Bend overhang inward.
- Gluing the next page, slightly overlapping the previous one. The shades are slightly tapered, so the pages couldn’t go down straight, but it didn’t seem to matter.

We kept on spraying, layering, smoothing, trimming until the whole shade was covered, then moved to the next one. Before long, all three were done.

After letting the shades dry overnight, we applied 2 coats of the Verathane finish. It deepened the color and gave the shades a slight sheen.

Here’s what they look like installed:


Now that we have a fun project under our belt, we can gear up for something more utilitarian – like changing the weatherstripping on the front door…blah.
If you liked this post you may also like:


this looks great. I am going to have to give it a try
LikeLike
Great! Please let us know how it works for you and what kind of paper you use!
LikeLike
Thanks…I literally have 3 lampshades that had been “rode hard and put away wet” from our living room. I COULDN’T throw them away because they are a cool square-ish shape. I am going to try this. Think I’ll use some old maps, maybe, since my teen-age boys are into geography. Enjoy your posts and thanks again for the inspiration!
LikeLike
Using maps is a great idea – you could overprint latitude and longitude numbers and/or placenames over the top – that would be cool. Good luck and have fun!
LikeLike
Wow, love them! have a slight obsession with collecting Websters dictionaries… so of course I’m going to love lamp shades made with dictionary pages! I want to make some!
LikeLike
Go for it! Just remember the older the dictionary, the more delicate the paper, so be careful when you are trimming/snipping the edges. Have fun, it is such a rewarding project!
LikeLike
OMG is sooooo overused (guilty), but I just have to say it….I LOVE those. I laughed when you said people were frightened everything in your house would soon be covered in dictionary pages…I get it…at one time, I was tole painting anything that stood still. I’m always impressed by your originality, I’m know when I pop in I’m going to see something inspiring and completely new. Welcome back.
LikeLike
Thanks Boomdeeadda! Re. tole painting, hopefully you never went so far as painting your toilet seat cover… now that would be taking it a little too far! ;o)
LikeLike
Ha, nope toilet seat is sans artwork, but I did have one of those cushy, pillow-ish toilet seats once..NOW that’s *good* decorating… 😛
LikeLike
Great project!
LikeLike
This project seriously could not be more fabulous. Love.
LikeLike
Thanks Eva!
LikeLike
Great idea. I was just about to throw a stained lamp shade into the garbage but now I think I will re-invent it. Thanks for the inspiration.
LikeLike
Hey, glad to help! Good luck and have fun!
LikeLike