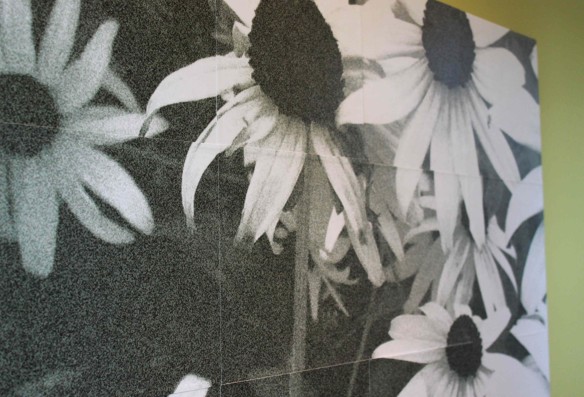
What was needed in our upstairs hallway were 2 pieces of large-scale graphic art. (What really was needed was clean laundry, but …) We mounted a collage of black & white photo prints onto pieces of plywood for an economical solution for bare walls.
Building the Base: I wanted to use materials that we had on hand. Mary Jean had some smooth plywood sheets left over from her kitchen remodel. Using a skilsaw, we cut 2 squares, 32″ each. We sanded the edges to remove the rough bits.
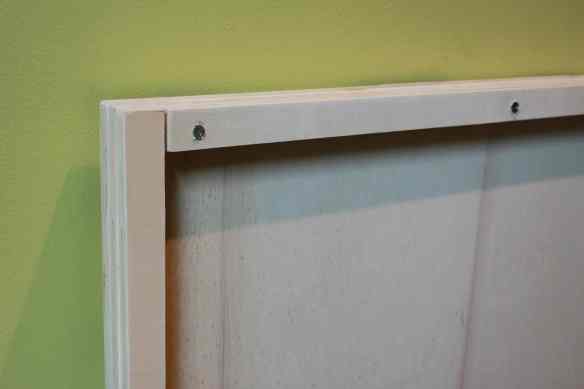
Creating the Illusion of Mass: So that the prints would look more substantial and 3-dimensional, we built up the back of the plywood by cutting, gluing, and attaching additional strips of plywood to the edges.
- Measured and marked 1″ strips on plywood.
- Clamping and cutting wood strips.
- Wood strip, before sanding.
- Sanding the edges of the strips.
- Wood strip with nice clean edge, after sanding.
- Finished cutting (finally).
- Applying wood glue to wood strip.
- Layering 2 strips together.
- Taping 2 strips so they stay together and edges are flush.
- Clamping the bundle of taped strips to stabilize while they dry.
- Attaching the doubled-up strips to the back of the plywood by gluing and clamping. In addition, we secured the top with screws for additional strength for hanging.
Images: My daughter took a great photo of black-eyed susans on our vacation last summer. I converted it to black/white, increased the contrast, and added a “film grain” filter in photoshop. I enlarged it, cropped it 2 different ways, then printed it out in 8.5″ square sections on a white cover stock. (I tried photo paper at first, but the regular cover stock worked better, and was less expensive.) I printed the entire image slightly larger than 32″ square so the edges could overlap slightly, leaving no gaps.
Mounting the Prints to the Plywood: After printing the 2 sets of images, we trimmed them out with an exacto knife and used Mod Podge ® to attach them to the board.
- Lay out the black/white copies. (It is a good idea to label the backs.)
- Trim copies.
- Position trimmed copies onto plywood.
- Mod Podge ®, tray, foam brush, brayer.
- Starting in one corner, spread Mod Podge ® onto board.
- Spread Mod Podge ® onto back of paper.
- Spread Mod Podge ® onto top of paper.
- Position paper, and use brayer/roller to press paper down securely onto board, squeezing out excess Mod Podge ®, working from the center of the paper out to the edges. Do not continue going over the same area with the brayer or the paper will break apart and lift off.
- Working row by row, continue attaching each piece of paper. We slightly overlapped them, leaving no gaps.
- Completed top and bottom rows. Continue until entire collage is attached to board. Allow to dry.
- Apply second coat of Mod Podge ® after 1st coat has dried. Roll over with brayer while wet for a nice stippled texture.
All Done! We located the studs and drew a pencil line on the wall with a level. We attached nails into 2 studs and hung the prints on the nails.
If you liked this post you may also like:


Pingback: Big impact artwork. - Mod Podge Rocks
Thisis great…I’ve been searching for the best ways to do large prints. I’d like to apply a large print of one of my photos to an antique barn door which I am making into a kitchen table…and also onto a glass table I built. Did you do the large print yet? And have you tried this on glass?
LikeLike
Hi Joel, That sound like a great project – The “Big Impact Artwork” pieces were done with tiled, small (8×8?) pieces of paper so it was super easy to work with. We did do a large scale picture using one large format print-out, but we used spray mount and Verathane. You can read about that here I think it would be just too hard to try to Mod Podge a huge image down onto a surface. The only time I’ve tried adhering something to glass was the votive candles – you can see that at the Mod Podge Rocks blog. It actually worked really well. For a table, you would want to put several layers of some super hard over the top though – I like the Verathane, it has a nice hard finish. I like the satin finish, but have not had good luck with the spray version. We use a foam brush and brush it on. Sometimes we’ll do a “swoosh” pattern so the brush strokes (even though they are pretty subtle) look more intentional.
Hope this helps, good luck with your projects. Send photos if you can!
LikeLike
Great! I will follow up and give it a try on the larger pieces. It’s a very rough surface ( the barn door) but I have filled in a lot with Varithane. I don’t mind if the whole image attaches, so long as a rough silhouette appears. As far as the glass table, I would do it in the underside. And just a couple spots…so I’d want to be sure wherever a picture was not, the glass would still be perfectly clear (no glues or other materials to blur or smudge…)
LikeLike
Ok, I love the large print. Wow, can’t wait to try! Although other photo transfers to wood (not with posters) seemed to bring a sort of translucent or thin layer if just the colors (or black and white) without the paper medium. That’s what I’d like for my two projects. For the glass table it will allow some light to penetrate. For the barn door it may allow for the wood to “shine through” as well as be kind of fitted and impressed into the raised wood grain. Does that make sense?
LikeLike
Yes, that makes sense – I see what you are saying about the translucent quality. For the wood door, that seems like a pretty easy thing to achieve. For the glass, maybe a little harder – might be hard to get a really clean look and not have any of the transfer medium edges show. I tried the transfer method onto glass with Elmer’s glue + Mod Podge and it did leave an edge, which didn’t matter too much in that case because the glass wasn’t clear so it wasn’t very obvious. https://hammerlikeagirl.wordpress.com/2012/11/26/mod-podge-a-salvaged-window/ There’s always research on google 🙂 and lots of tests on extra pieces of glass. Good luck, should be a great project!
LikeLike
Joel, now that I’ve thought about this more, for the glass table are you talking about putting the image onto the top of the glass or to the underside?
LikeLike
Hey, how are these holding up. Is the mod podge still sticking? I can’t wait to get a house. So many good ideas.
LikeLike
They are holding together and doing great. Would like to make another large format picture from an old picture of my parents from when they were in first grade – it is a great picture standing in front of an old brick wall – she is wearing a scarf and he a cap. She said she always knew she was going to marry him. This time I think I may try to send out for a large print and not piece it together. Might be awkward grappling with a large sheet of paper, but I think I will spray the plywood and slowly roll the print onto it, then put a coating over the top. Maybe use verathane instead of mod podge. (thinking it out here, way more of an answer than you expected!)
LikeLike
OHHH! That sounds like the perfect photo, so sweet. Fantastic story to share in your home everyday. LOVE it! I like the Verathane idea -vs- Mod Podge too. Have you seen those gallery walls where they’ll take one large photo and mount it on say ‘nine’ individual plaques? I like that look too for large photos. I’ll watch for it in all it’s glory.
LikeLike
Awesome idea!!! I happen to have extra plywood lying around!!! This is now on my list of things to do!!
LikeLike
Great, let us know how it turns out! 🙂
LikeLike
What an awesome idea! I did something like using insulation foam from Home Depot as the backing instead of plywood. I’m always nervous to hang a heavy picture on the wall and then have it fall on one of the kids’ heads when they (inevitebly) knock their heads into a wall, so foam it was 🙂 Great blog!
LikeLike
That is a good idea to use something lighter! So far, mine have not fallen on anyone’s head, although our eleven year old has been riding her unicycle down that hallway, so maybe it is only a matter of time!
LikeLike
SO pretty! I really love how large it is and what a statement it makes. And so special that your daughter took the photo!
LikeLike
Thanks, it was really fun to do – just what that narrow hallway needed. Love your blog, so many great ideas!
LikeLike
Love this. Pinning it for future reference–I’ve got a photo in mind for it!
LikeLike
That is beautiful. I love it against your wall color.
LikeLike
Thanks Ruth!
LikeLike
This is beautiful and unique. Such a great way to display your favorite things.
LikeLike
Wouldn’t your barn photo look nice blown up like this?
LikeLike